This post may contain affiliate links. Please see our disclosure policy for more details.

This is one of those recipes that’s grown with my kids. I first made these peanut butter waffles when introducing peanut butter to my baby, and they’ve stuck around through toddlerhood and beyond, for good reason!

Why These Peanut Butter Waffles Just Work
- Soft and easy to eat – perfect for babies and toddlers
- Naturally sweet – no added sugar needed
- Actually filling – thanks to protein + healthy fats from peanut butter
- Veggie-loaded (but you’d never know)
- Freezer-friendly – make once, enjoy all week
Peanut butter is also one of the top allergens and it’s recommended to introduce it to your baby early and often to minimize the risk of developing a peanut allergy. Here’s the ultimate guide to peanut butter for baby.
These peanut butter waffles aren’t too sweet so you can add either sweet or savory toppings to pack in even more nutrition with every bite. You might also love these sweet potato waffles, which bring natural sweetness and wholesome flavor to the table, whether you top them with nut butter or something savory.
Same goes for these pumpkin baby waffles, strawberry waffles, and mini waffles! And if you’re looking for another protein-packed option, these cottage cheese waffles are a must-try—mild in flavor, easy to blend up, and perfect for both sweet and savory toppings.
Table of Contents
- Why These Peanut Butter Waffles Just Work
- Is your baby 6 months old and up?
- Key Ingredients
- Waffle Maker
- How to Make Peanut Butter Waffles
- Recipe Tips
- How to Store Peanut Butter Waffles
- Serving Suggestions for Babies and Toddlers
- Is your baby 6 months old and up?
- Peanut Butter Waffles FAQs
- More Peanut Butter Recipes
- Peanut Butter Waffles Recipe

Is your baby 6 months old and up?
Learn all the secrets to starting solids safely while optimizing nutrition!
Key Ingredients
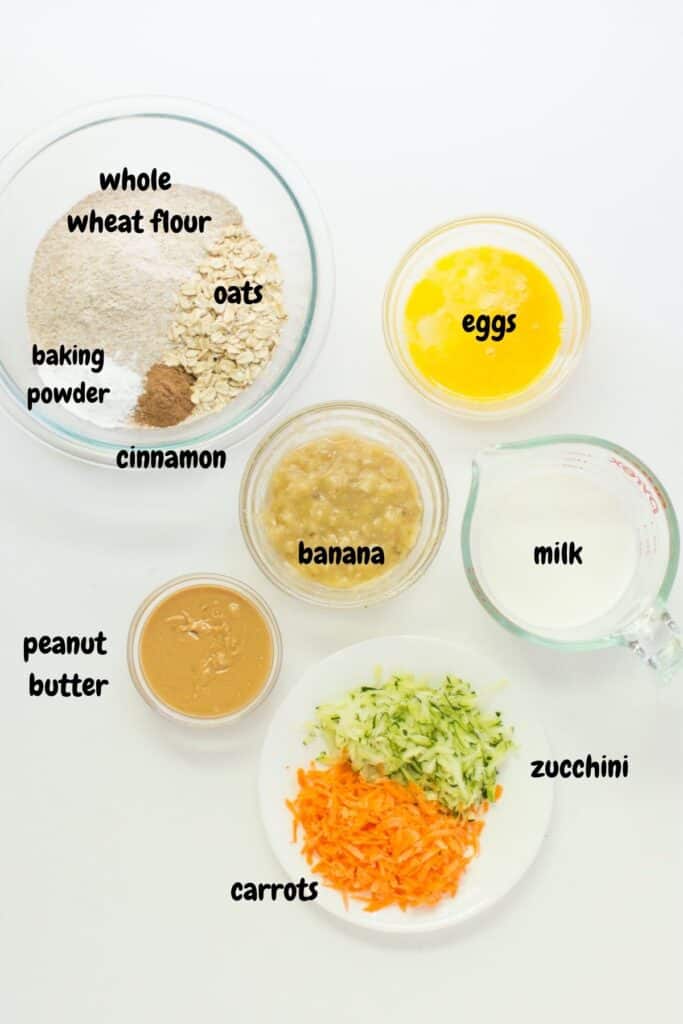
- Whole wheat flour – You can also use white whole wheat flour (still 100% whole grain), if you prefer a milder flavor.
- Rolled Oats – I personally love the texture and heartiness it brings to any baked good. It also thickens the batter, resulting in waffles that are soft on the inside and lightly crispy on the outside.
- Smooth, creamy peanut butter – Do NOT use crunchy peanut butter for this. In addition to boosting nutrition, it adds a hearty, nutty flavor. Feel free to substitute with any nut butter of choice or sunflower seed butter if there’s an allergy.
- Eggs – use room temperature – you’ll end up with lighter, fluffier waffles!
- Milk – If there’s an allergy, here are my top two non-dairy alternatives.
- Carrots and zucchini (optional)– be sure to squeeze out as much moisture as possible. Feel free to do all carrots or all zucchini if that’s easier. While you’re at it, grate extra and make these zucchini carrot avocado muffins!
Waffle Maker
The one we have is a Belgian waffle maker, and we absolutely love it!
As you can see in the pictures, the waffles are thicker and larger than standard waffles because the waffle iron has deeper grids. The ability to flip the waffles over is also an awesome feature as it helps create fluffy and evenly browned waffles.
I had a friend try this recipe out using her regular waffle maker and she said the waffles turned out perfectly light and fluffy!
The husband is the master waffle maker around here as I don’t want to learn how to use yet another gadget. And he finds it therapeutic so it’s a win-win! Apparently waffles cook faster in a regular waffle maker than in a Belgian waffle maker so definitely bake according to your manufacturer’s instructions.
You can also use this mini waffle maker, which will give you the most adorably sized waffles.
How to Make Peanut Butter Waffles

Step 1: In a large bowl, whisk together the dry ingredients.

Step 2: In another bowl, combine the wet ingredients.

Step 3: Combine the wet and dry ingredients and mix until just incorporated. Be careful not to over-mix. Let the waffle batter sit for 10 minutes.

Step 4: Add to preheated waffle iron and bake – using about 1/2 cup of the batter per waffle.
Recipe Tips
- If adding the veggies, be sure to squeeze out as much excess moisture as you can from the zucchini and carrots by using a dish towel or cheesecloth.
- Do NOT overmix the batter or you’ll end up with tough rather than light and fluffy waffles.
- Let batter sit for 10 minutes or so to make sure the flour and oats soak up the liquid making the batter thicken. This will also allow the gluten to expand a little, resulting in a more tender texture.
- Be sure to preheat your waffle maker. If you don’t, the exterior won’t crisp up properly.
- Due to the variations of waffle makers (e.g. models, sizes, etc) on the maker, each waffle maker will vary in how long it takes for the waffles to cook through. So bake according to your manufacturer’s instructions.
- Don’t stack the waffles on top of each other as you wait for them all to be made. The heat and steam from them will cause the waffles to get too soft. If you wish, you can keep them warm in the oven while you wait for the rest to finish cooking.

How to Store Peanut Butter Waffles
Let waffles cool completely in a wire rack after cooking. Then store in an airtight container in the fridge for 2-3 days or freeze for up to 3 months.
To freeze, lay them on a cookie sheet and flash freeze, just like how you would freeze pancakes.
When ready to heat, pop them into the toaster or toaster oven. You can also place in the microwave for 1 minute per waffle – won’t be as crispy but still tasty. These can also be enjoyed cold, making them perfect for an easy school lunch!
Serving Suggestions for Babies and Toddlers
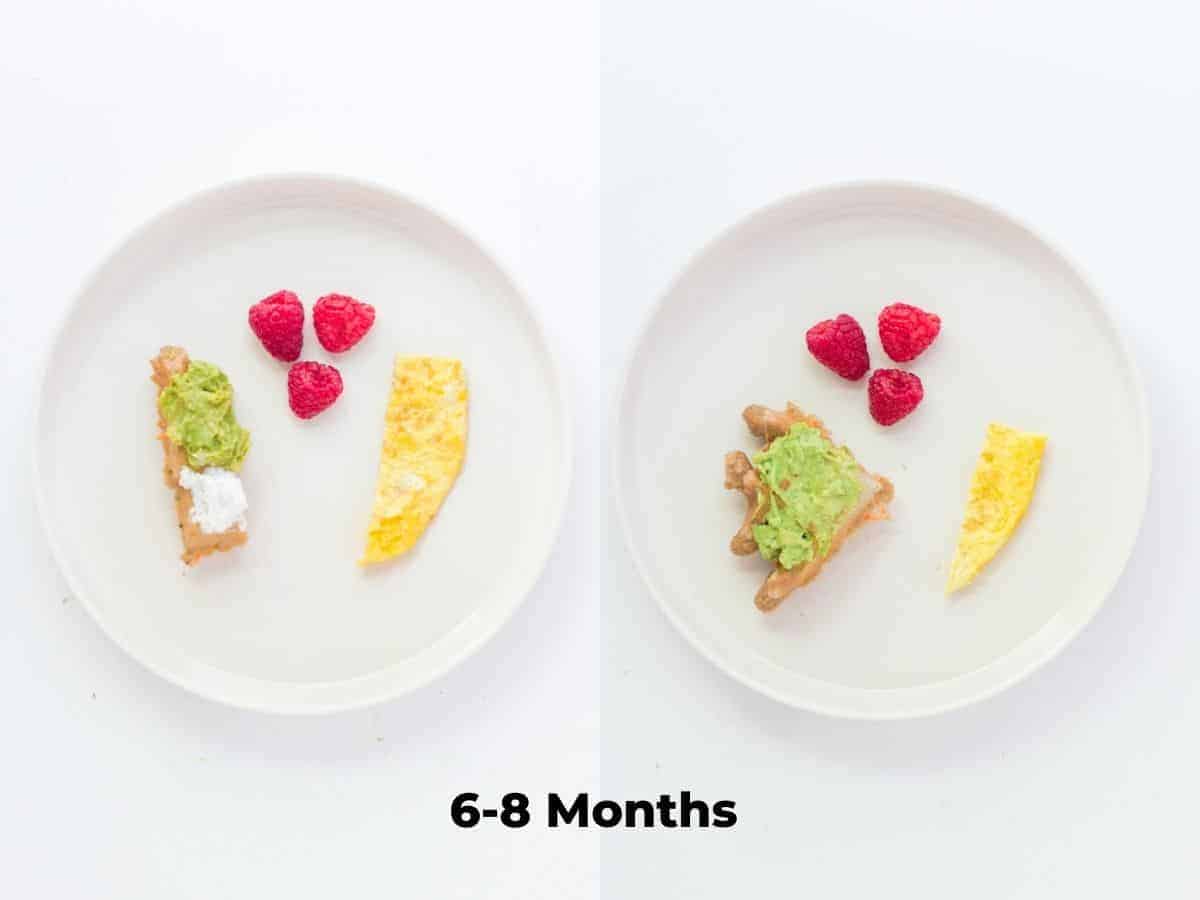
6-8 months: (pictured: waffles with mashed avocado and yogurt, raspberries, omelette strip). Bigger the better at this age so either quarter or cut into strips so your baby can grab with their palm.
Is your baby 6 months old and up?
Learn all the secrets to starting solids safely while optimizing nutrition!

9-12 months: You can cut into bite-sized pieces or serve large pieces so your baby can practice taking bites.
By the way, this plate is AMAZING! It’s so spacious, allowing plenty of room for small hands to explore, and the suction is so powerful! My baby has not once been able to remove it from the table.
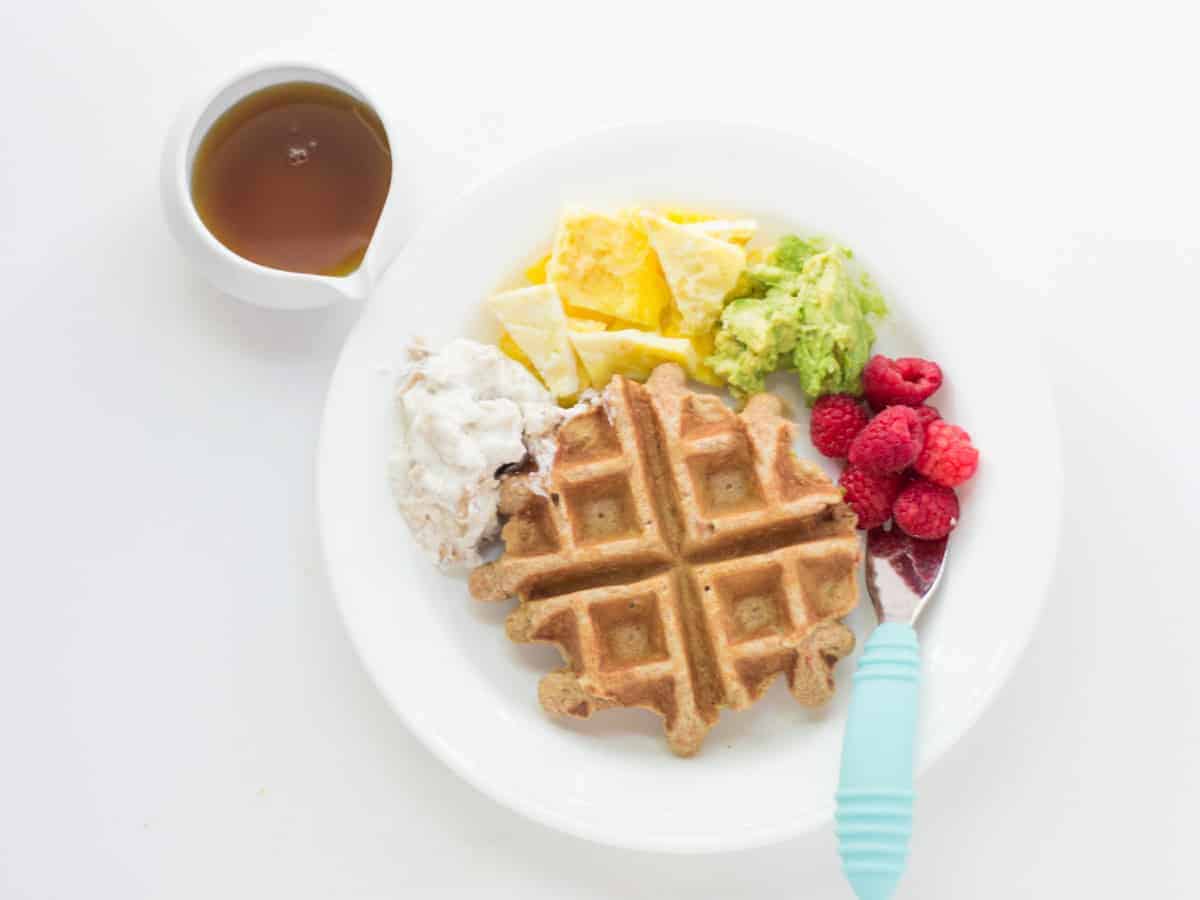
For toddlers, here’s a fun idea – DIY waffle bar ;). Serve the waffle alongside various toppings and see what fun combinations they come up with.
Peanut Butter Waffles FAQs
Yes! You can substitute each egg with a flax egg (1 tablespoon ground flax + 2.5 tablespoons water). The texture will be slightly softer but still works.
You can mix the batter a few hours in advance and store it in the fridge. Give it a quick stir before cooking.
Make sure your waffle maker is well preheated and lightly greased if needed.
More Peanut Butter Recipes

Did you make this recipe? Leave a rating below and let me know how you liked the recipe! Your feedback means so much to me!

Peanut Butter Waffles
Equipment
Ingredients
Dry Ingredients
- 1 1/2 cups (235g) whole wheat flour
- 1/4 cup (25g) rolled oats
- 2 teaspoons baking powder
- 1 teaspoon cinnamon
Wet Ingredients
- 1/2 cup (120g) mashed ripe banana
- 1/3 cup (75g) creamy peanut butter
- 2 medium eggs lightly beaten, at room temperature
- 1 1/2 cups whole fat milk
Optional
- 1/2 cup shredded carrots (50g measured before squeezing)
- 1/2 cup shredded zucchini (60g measured before squeezing )
Instructions
- Preheat oven to 200 degrees Fahrenheit if you want to keep waffles warm.
- In a large bowl, mix all the dry ingredients until evenly distributed.
- In a separate bowl, combine the wet ingredients. If adding suggested vegetables, be sure to squeeze dry the zucchini and carrots before adding.
- Combine wet and dry ingredients together. Be careful not to over mix. Let the batter sit for 10 minutes or so.
- Preheat waffle iron. Grease by brushing or spraying with oil. Pour in 1/2 cup batter and cook according to manufacturer's directions until golden brown.
- If desired, place the waffles on a baking sheet and keep warm in the oven while you finish cooking the rest of the batter.
Notes
- Do NOT overmix the batter or you’ll end up with tough rather than light and fluffy waffles.
- Let batter sit for 10 minutes or so to make sure the flour and oats soak up the liquid making the batter thicken. This will also allow the gluten to expand a little, resulting in a more tender texture.
- Due to the variations of waffle makers (e.g. models, sizes, etc) on the maker, each waffle maker will vary in how long it takes for the waffles to cook through. So bake according to your manufacturer’s instructions.
Nutrition

Do you want to minimize picky eating and set a solid foundation for a lifetime of healthy eating habits?
Check out this 3 month mastering self-feeding program! It’s the closest thing to me being in your kitchen


Hi Min,
Is whole wheat pastry flour suitable? And if I use home made almond milk is that ok you need the fat from whole milk?
My baby is allergic to eggs. Can we use flax egg?
You can!
I don’t have a waffle maker. Can I use a pan to make them?
The perfect waffle for baby! I follow the recipe as written (and have made them several times!). My 1-year old loves these. I freeze the extras so I can have a quick breakfast on hand or something easy to serve him for lunch. I like to accompany these with whole milk greek yogurt (with cinnamon added) and/or unsweetened applesauce.
Yay!! These are one of our freezer staples too!
Super quick to whip up! My family absolutely loved them. I didn’t have zucchini so I just doubled the carrot. Next time I would like to add some ground flaxseed to them.
So happy to hear that your family enjoyed these waffles!
Thank you for always posting recipes that are easy to do! It’s great that this recipe has veggies in it, it’s rare to find breakfast recipes that include vegs in it (besides muffins). This was a hit with my toddlers, we used wholemeal spelt flour. I’m from Australia, I believe whole wheat flour is the same as wholemeal flour here. Thanks for putting in the metric measurements too!
Hi Iris! I’m so glad these waffles were a hit! You should try my veggie french toast, savory baked oatmeal, or zucchini baked quinoa next ;). A delicious way to get more veggies first thing in the morning
These are exactly what I was looking for! My almost 2 year-old loves waffles, so I’m happy to expose her to more veggies in a form that I know she’ll eat. They’re easy to make and I’ve frozen most of them for later. So handy!
I’m so glad!! What are other foods she likes to eat? I will try to come up with a veggie-loaded version too 😉
Well, I’ve made her a bunch of your recipes and most of them are a hit! Keep up the awesome work! 😉
Can we use any other veggies too, like broccoli? Thanks!
You bet!
my kids both baby and toddler love this waffles! i always made more and freeze them, its so convenient and healthy.
thank you Min
Most definitely a freezer staple for us too! Thanks for sharing, mama!
Whole wheat flour alternative?
All purpose, white whole wheat, spelt, etc..all will work. Not sure about GF flours like almond, but 1:1 GF flour should be fine.