This post may contain affiliate links. Please see our disclosure policy for more details.

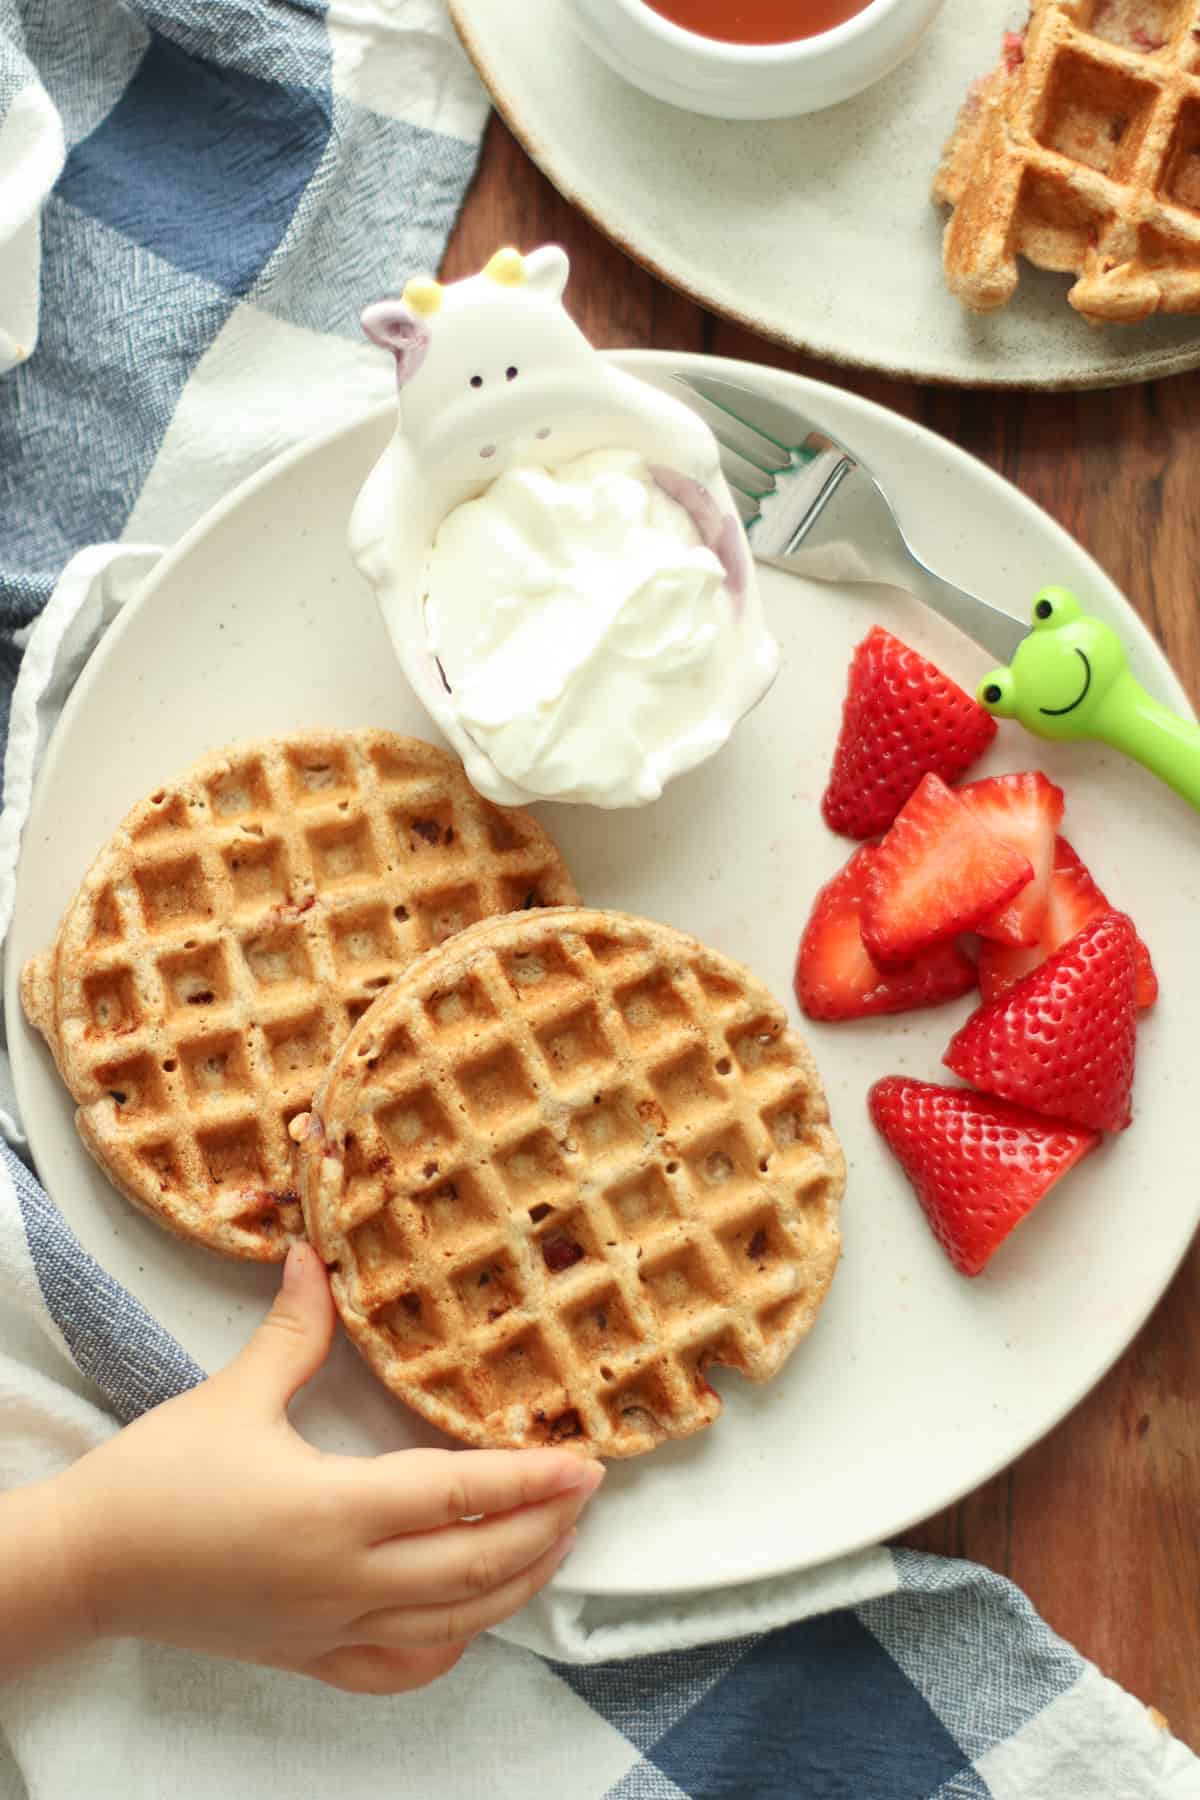
Bursting with sweet, juicy strawberries, these strawberry waffles are quickly going to become a family favorite! Made with simple, healthy ingredients and no added sugars, these waffles are the perfect way to start the day.
Reasons to love this Strawberry Waffle Recipe
My family can’t gobble these waffles up fast enough! The only downside to that is I don’t get to freeze many. And if you know me, building a good freezer stash is like my pride and joy haha.
These fresh strawberry waffles are:
- Made with simple, easily accessible ingredients. I don’t do recipes with a laundry list of ingredients.
- Nutritious! You’ve got protein and healthy fats from the milk and yogurt, fiber from the whole grains, and natural sweetness from the strawberries – the perfect breakfast.
- Even though they’re made with whole wheat flour, you’re going to be surprised by how light and fluffy these easy strawberry waffles are!
- Easy to whip up.
- So delicious and kid-approved!
- Freezes beautifully. Makes for a great make-ahead breakfast.
Hungry for more homemade waffles? Try these Peanut butter waffles (with veggies), 2 ingredient cheese waffles, pumpkin waffles, and sweet potato waffles!
And here’s a basic mini waffle recipe that is highly customizable.
Looking for something high in protein? These Cottage Cheese Waffles are another great option—easy to make in the blender, freezer-friendly, and perfect for busy mornings!
Table of Contents
Ingredients
I am highlighting just the ones that need further explanation. The complete list is in the recipe card below.
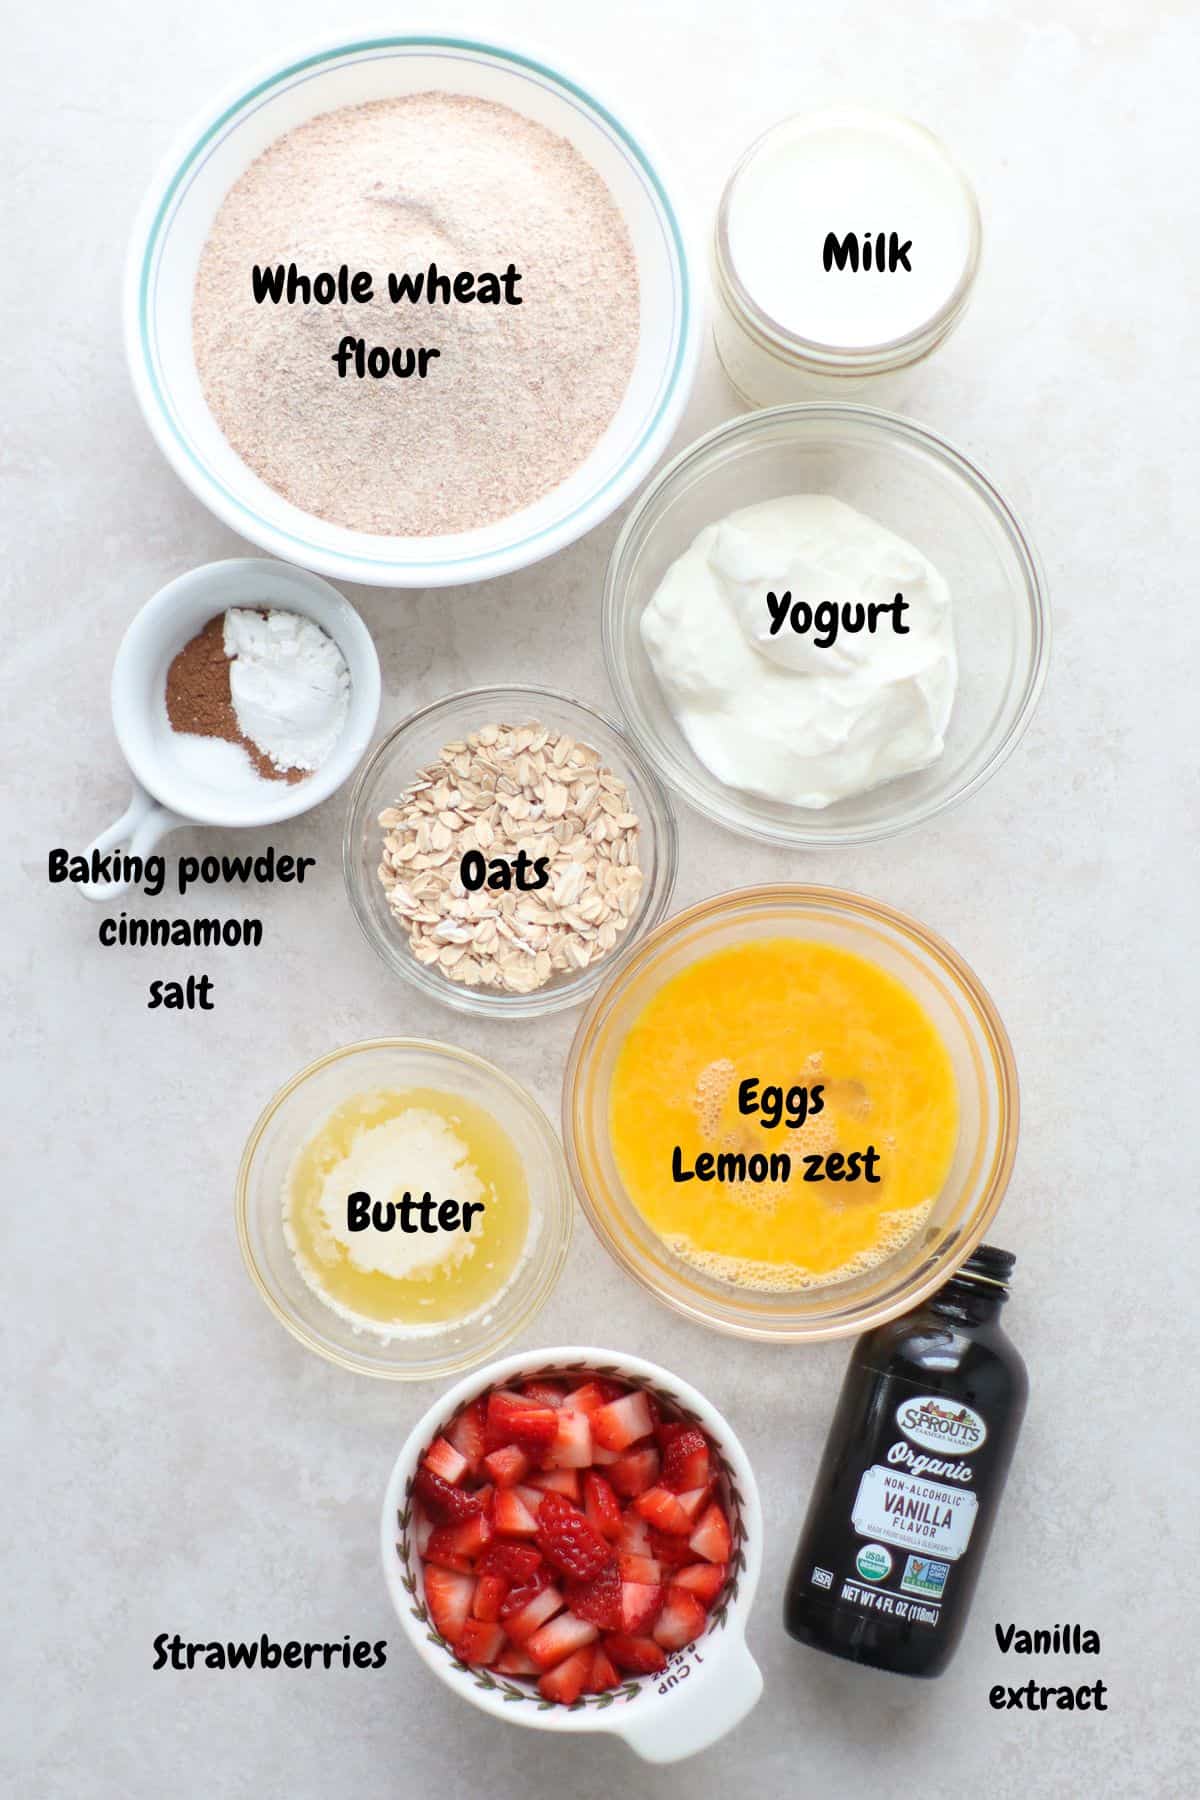
- Whole wheat flour – if you want a milder flavor, use white whole wheat flour, which is also 100% whole grain. You can use all purpose flour but I really like the nuttiness that whole wheat flour imparts in these waffles as well as extra fiber.
- Rolled oats – Even though the amount doesn’t seem like much, it adds great texture and heartiness to the waffles. It also thickens the batter so that you’ll end up with waffles that are soft on the inside and lightly crispy on the outside.
- Milk – I highly recommend using whole milk. Our babies and kids NEED fat for optimal brain development. If there’s an allergy, here are my top two non-dairy alternatives.
- Yogurt – You can use all milk, if you wish, BUT adding yogurt will give you softer and fluffier pancakes.
- Eggs – use room temperature for lighter, fluffier waffles.
- Butter – use unsalted
- Strawberries – I recommend using fresh strawberries for best results.
Waffle Maker
I absolutely LOVE our Belgian waffle maker! As you can see in the images, the waffles are thicker and larger than standard waffles because the waffle iron has deeper grids. The ability to flip the waffles over is also an awesome feature as it helps create fluffy and evenly browned waffles.
We also have this mini waffle maker that makes the most adorably sized waffles. The only complaint I have is that it takes longer to make a full batch.
All in all, Belgian waffles or mini waffles, you can’t go wrong with either one!
Step-by-Step Instructions
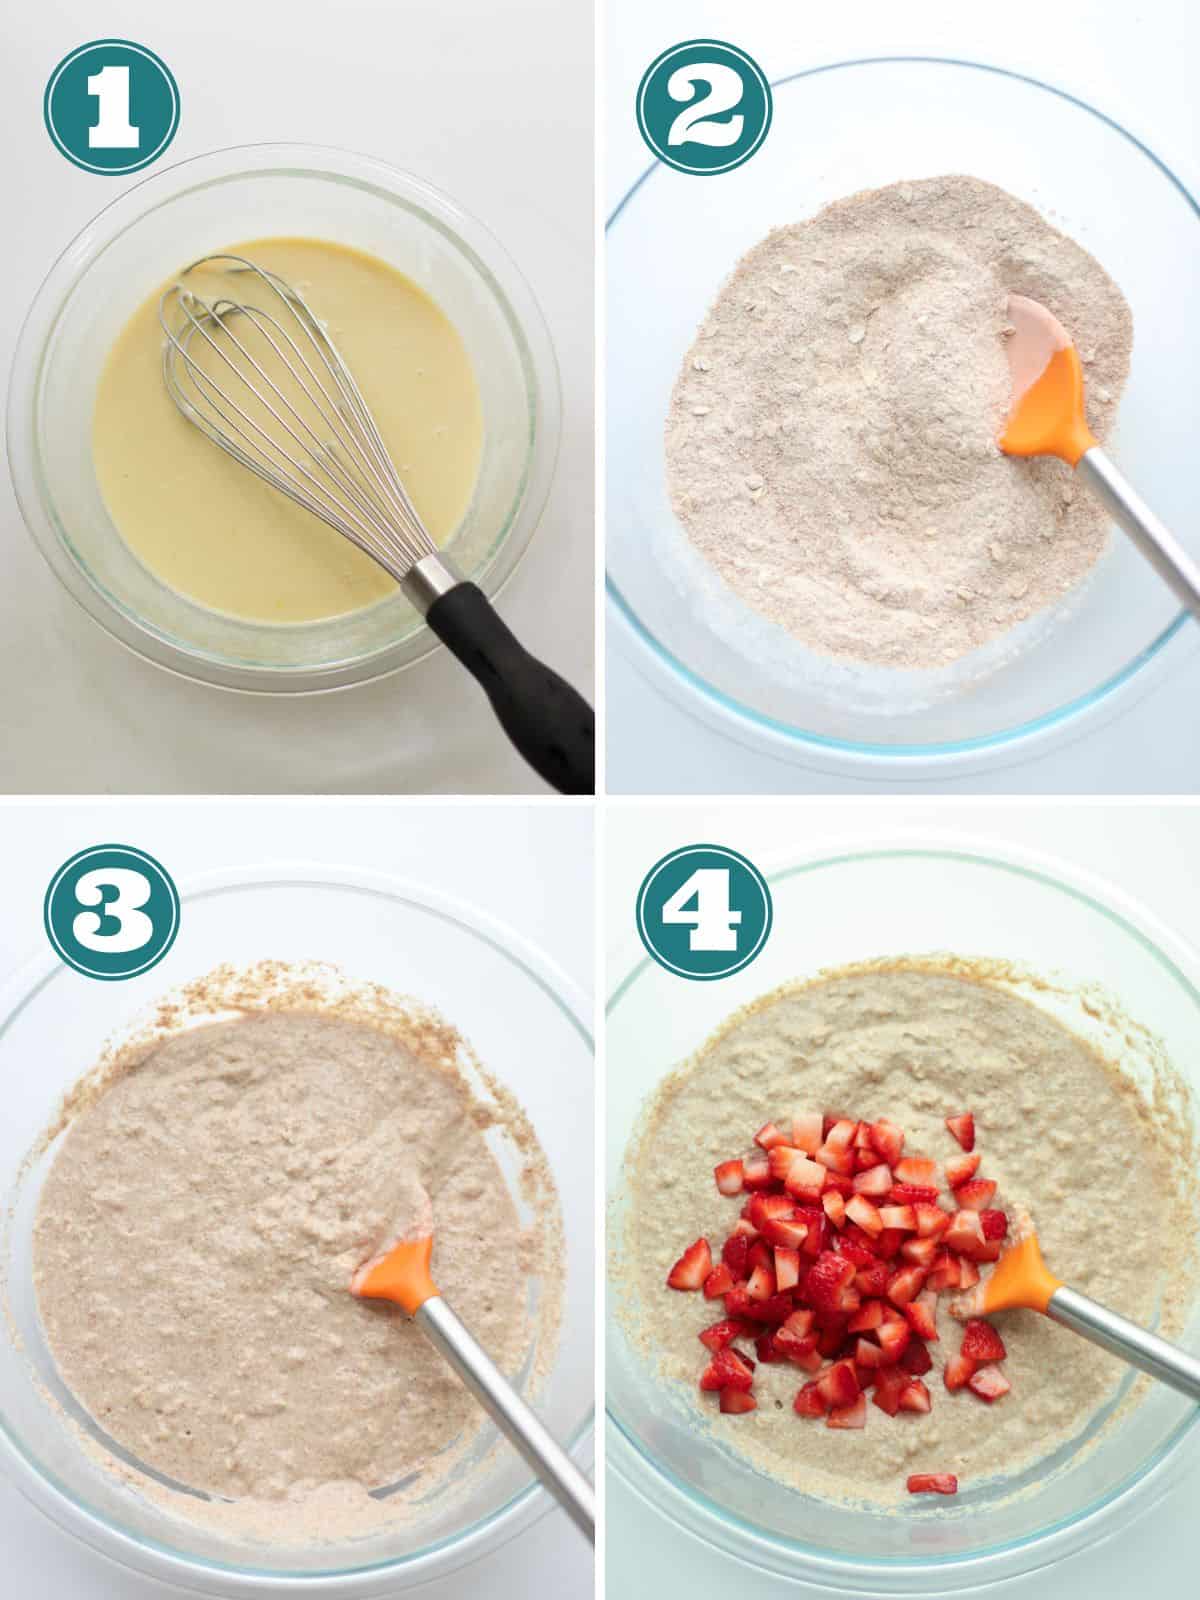
- In a medium bowl, combine the wet ingredients.
- In a large bowl, combine the dry ingredients and mix until just incorporated.
- Combine the wet and dry ingredients and mix until just incorporated.
- Stir in the strawberries. Be careful not to over mix. Let the waffle batter sit for 5 minutes.
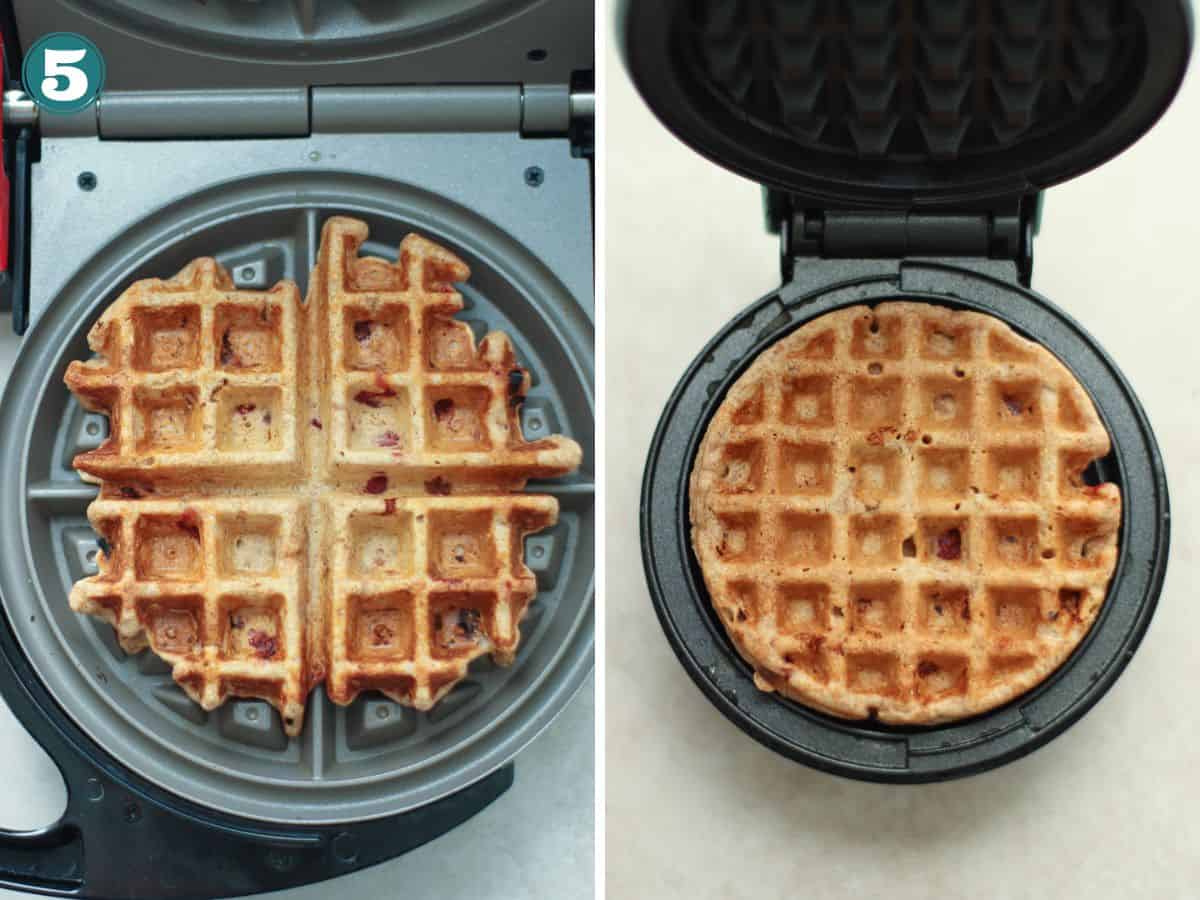
- Add to preheated waffle iron and bake – using about 1/2 cup of batter per waffle if using a regular sized waffle or 1/4 cup for the mini waffle maker.
Tips for Success
- You can leave out the lemon zest, BUT I highly encourage you to add it if you can. It really brings these pancakes to life!
- If your strawberries are not very sweet, I recommend adding 1-2 tablespoons of maple syrup, honey, or date syrup. Or skip all together and enjoy with sweet toppings.
- Just like I advise with muffins, take eggs, yogurt and milk out of the refrigerator at least 15 minutes prior to baking.
- Combine the dry and wet ingredients really well separately to ensure that the waffles rise evenly.
- Do NOT over mix the batter or you’ll end up with tough rather than light and fluffy waffles.
- Let batter sit for at 5-10 minutes to make sure the flour and oats soak up the liquid making the batter thicken. This will also allow the gluten to expand a little, resulting in a more tender texture.
- Be sure to preheat your waffle maker. If you don’t, the exterior won’t crisp up properly.
- Due to the variations of waffle makers (e.g. models, sizes, etc) on the maker, each waffle maker will vary in how long it takes for the waffles to cook through. So bake according to your manufacturer’s instructions.
- Cool in a single layer. Never stack the waffles on top of each other as you wait for them all to be made. The heat and steam from them will cause the waffles to get too soft. If you wish, you can keep them warm in the oven while you wait for the rest to finish cooking.
Frequently asked questions
You can use oil and non-dairy milk and yogurt of choice.
You can but they contain more moisture and will “bleed” into the batter. You will also run the risk of strawberry juice spilling out onto the waffle maker, which can be a headache to clean up. I recommend using fresh strawberries for best flavor and texture.
Strawberry Waffle Topping Suggestions
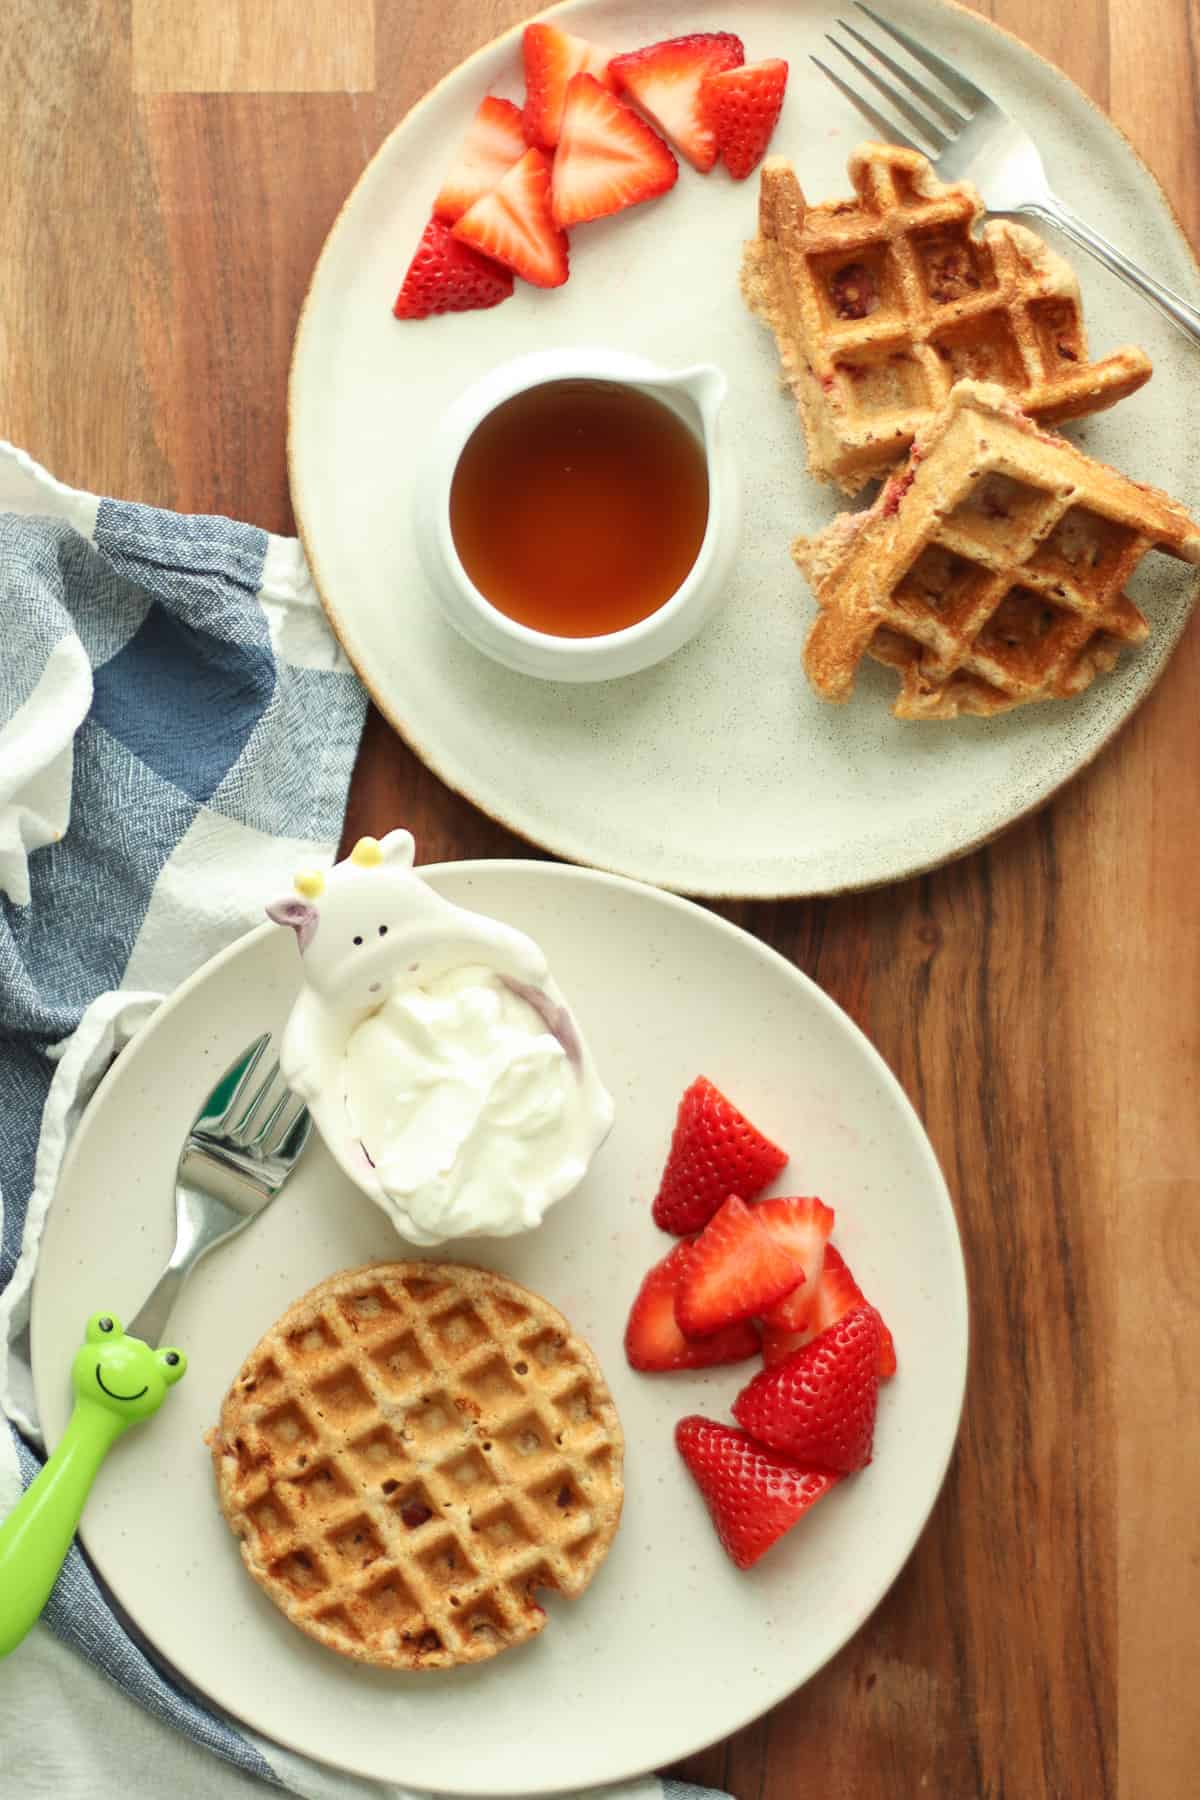
You can certainly drizzle some honey or maple syrup on top of these waffles but here are some toppings to elevate your waffle experience even more!
- Drizzle of peanut butter or any nut butter or seed butter, if there’s an allergy
- A dollop of yogurt with a sprinkle of hemp seeds for a boost of nutrition
- Cream cheese frosting – this healthy version isn’t just for cakes!
- Sugar free strawberry jam
- Unsweetened applesauce
- Fruit – Such as fresh strawberry slices, Fresh berries
Storage Suggestions
Cool leftover waffles completely after cooking. Then store in an airtight container in the fridge for 2-3 days.
To freeze, lay them on a cookie sheet and flash freeze. This allows you to easily remove from the freezer one at a time. Check out my how to safely store leftovers post for details!
When ready to heat, pop them into the toaster or toaster oven. These can also be enjoyed cold – perfect for preschool lunch (or kid’s lunchboxes) or school snack.
More Strawberry Recipes


Did you make this recipe? Leave a rating below and let me know how you liked the recipe! Your feedback means so much to me!

Strawberry Waffles
Equipment
Ingredients
Dry
- 1 1/2 cups (235g) whole wheat flour
- 1/4 cup (25g) rolled oats
- 1 teaspoon cinnamon
- 2 teaspoons baking powder
- 1/4 teaspoon salt
Wet
- 1 1/4 cup whole milk
- 1/2 cup plain Greek yogurt (120g)
- 2 eggs, beaten
- 2 tablespoon butter, melted and cooled
- 2 teaspoons vanilla extract
- 1 tablespoon lemon zest
- 1-2 tablespoons maple syrup or honey (optional), see note
- 1 cup chopped strawberries
Instructions
- Preheat oven to 200 degrees Fahrenheit if you want to keep waffles warm.
- In a large bowl, mix all the dry ingredients until evenly distributed. In a separate bowl, combine the wet ingredients.
- Combine wet and dry ingredients together. Gently fold in strawberries. Be careful not to over mix. Let the batter sit for 5 minutes or so.
- Preheat waffle iron. Grease by brushing or spraying with oil. Pour in 1/4 cup batter (or more if using a regular sized waffle maker) and cook according to manufacturer's directions until golden brown. If using the mini one I recommend here, 2 minutes and 45 seconds was perfect!
- If desired, place the waffles on a baking sheet and keep warm in the oven while you finish cooking the rest of the batter.
Notes
- If your strawberries are not very sweet, I recommend adding 1-2 tablespoons of maple syrup, honey, or date syrup. Or skip all together and enjoy with sweet toppings.
- Just like I advise with muffins, take eggs, yogurt and milk out of the refrigerator at least 15 minutes prior to baking.
- Do NOT over mix the batter or you’ll end up with tough rather than light and fluffy waffles.


These waffles were a hit for me and my husband (we will try them out with our toddler tomorrow as that will be the true test)! I am celiac so I made it with half gluten free flour and half oat flour by weight. I also reduced the milk to 1 cup as I could see my batter was quite thin already (due to the oat flour I am sure). For the rest I followed exactly and it turned out great. Thanks for the recipe!
Can I use organic all purpose flour instead?
Sure!
Really good! My husband had never eaten strawberry waffles before and he kept telling me how good they were. He had his drizzled with maple syrup. I didn’t add any sweetener to the batter. My toddler’s waffle pieces had plain greek yogurt, peanut butter, and strawberry puree over top and he ate every bit of it. 🙂
Makes me so happy to hear that your whole family enjoyed these waffles!
These were delicious! And pretty easy to make. Not very sweet, which was exactly what we were looking for, but of course one could always increase the maple syrup if wanting a sweeter waffle. Definitely will make it again!
Yay! yes we prefer our waffles not very sweet because we can always drizzle with maple syrup, jam, etc!