This post may contain affiliate links. Please see our disclosure policy for more details.
Looking for a quick and easy way to enjoy a well-balanced meal in the middle of a busy week? Mason jar salads are the perfect solution. With a little bit of planning and prepping in advance, you can nourish your body with wholesome ingredients throughout the week. Here’s a guide to building the perfect Mason jar salad.
As you may have seen in my series – Meal Prep Fridays – we absolutely love Mason jar salads around here. When I initially began my meal prep “journey” (it truly is a journey, as it continues to evolve over time with a noticeable increase in efficiency and creativity), I used to prep all the individual ingredients over the weekend and store them in individual containers. Come morning time, I would assemble our meals to take to school/work.
Although that would only take about 10 minutes, time is of the essence in the mornings. I can see you nodding your heads in absolute agreement. Not to mention the hassle of taking out all the containers (it’s quite a juggling act), opening and closing them, storing them back in the fridge…nobody has time for that. I’ve got my sparsely-filled eyebrows to tend to and my ridiculously limp hair to be “oomphed” up.
Enter Mason jars. These are what I like to use (affiliate link)
I resisted them at first because:
- I was stingy and didn’t want to go out and buy yet another set of containers
- I was skeptical and didn’t think my veggies would hold their integrity over time. And finally, I wasn’t going to mention this one, but…I also didn’t like that I’d have more dishes to do since you have to pour the salad from the jar onto another plate/bowl. Yes yes sounds silly, I know. But that’s just how much I hate doing the dishes! And since the Hungryman handles all the laundry, I couldn’t possibly ask him to clean the dishes as well! Or could I?…. 😉
However, we’re totally hooked on Mason jar salads now and eat them almost every week. And NOPE! We haven’t gotten sick of them. The key is to keep them exciting by switching up dressings and ingredients. Talk about endless possibilities!
Mason jar salads not only save you time, but they are such a fabulous way to get essential nutrients into your body no matter how crazy life gets. What could be easier than grab & go?
Step-by-Step Instructions:
So here are the BASIC steps to layering (pack each layer tightly):
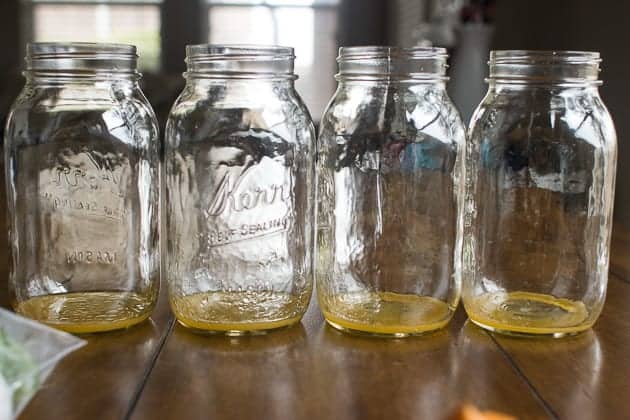
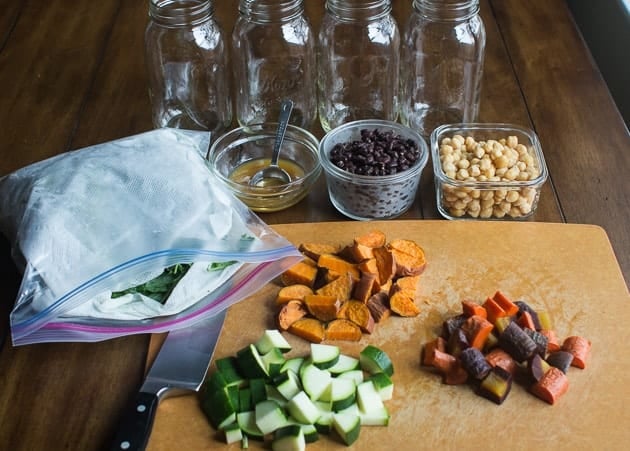
1. Add the salad dressing.
This step is key in keeping the salad free of sogginess. I normally use about 1-2 tablespoons, but you can add more if you desire. Just don’t go overboard with it. The amount I add depends on the rest of the ingredients. For instance, if the vegetables are roasted with pretty strong spices, I may add less. If they are all raw, then I may add a bit more. It’s all about trial and error.
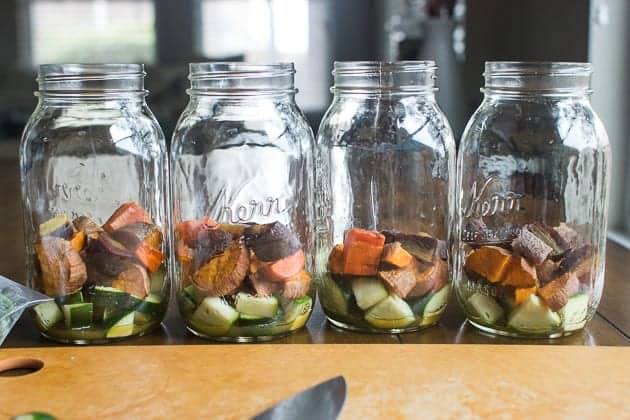
2. Add heartier vegetables
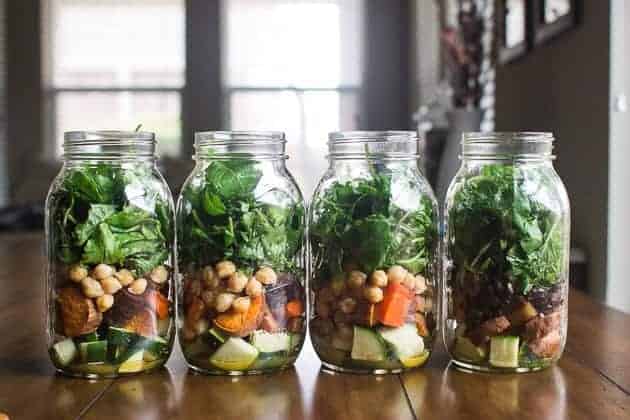
carrots, zucchini, sweet potatoes, tomatoes, cucumbers, radishes, bell peppers, etc. They serve as a nice barrier between the dressing and the more tender greens. I like to cut them a bit thicker so they will be less prone to soaking up the dressing. If I’m adding roasted vegetables, since they are a bit softer, I add them on top of the raw vegetables (as pictured above).
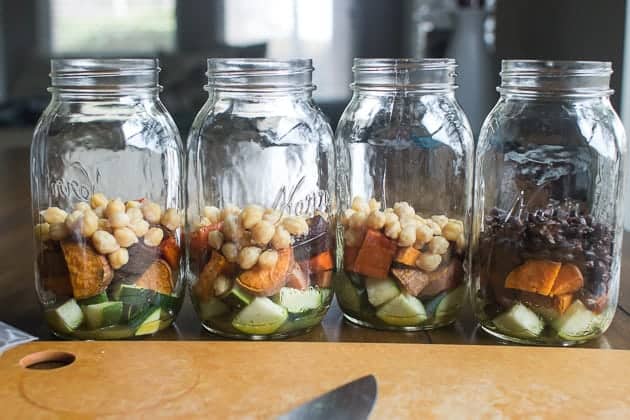
3. Add the beans, whole grains, or pasta.
Some of my favorites include chickpeas, adzuki beans, quinoa, brown rice, and barley. If I’ve cooked a pasta dish like spaghetti or a pasta salad, I may add that sometimes, too. In that case, I won’t add dressing since it’s already sauced up.
4. Add the salad greens
Tear them into smaller pieces and add to the top. If you are going to add a protein, leave some additional space at the very top.
5. Seal the jar tightly with the lid and store in the fridge
for 3-5 days.
6. The morning of:
if you want to add protein (e.g. chicken, tofu, steak, nuts, seeds), cheese, or soft fruits and vegetables (avocados, berries) add them on top of the greens.
7. To serve:
Give the jar a good shake and pour onto a plate/bowl. Enjoy!
Now that you know the basics, it’s time to have some fun and get creative! And if you need some inspiration, check out my weekly “Meal Prep Friday” series. I will be honest with you, though – not much thought goes into my creations. I don’t go to the grocery store looking for specific ingredients for these salads. Rather I use whatever I have on hand. I have found this to be a great strategy in ensuring that I use up all the produce in my crisper drawer and in reducing my food cost.
[Tweet “How to build the perfect mason jar salad via @mjandhungryman #mealprep #masonjar #RDchat”]
And for those of you who are wanting specific recipes, I will do my best to share them with you. But understand that the measurements don’t have to be exact and that the ingredients can be whatever you have on hand, not necessarily what I used. In other words, use these Mason jar salad recipes as a template. Perhaps what you may find to be most useful is the salad dressing recipe. With all that being said, here’s the recipe for the salad you see here:
Mixed Greens with Orange Ginger Vinaigrette (makes 4)
Salad
1 cup zucchini, sliced 3/4 in. pieces
1 cup roasted sweet potatoes
1 cup roasted carrots
1/2 cup chickpeas
4 cups mixed greens
Protein of choice: chicken, steak, egg, tofu, nuts, seeds, etc.
Cheese
Dressing
3 tablespoons freshly squeezed orange juice
1 tablespoon canola oil
1 tablespoon rice vinegar
2 teaspoons honey
1 teaspoon low-sodium soy sauce
1/2 teaspoon fresh ginger, minced


This is SUCH a great idea – we are really terrible at figuring out quick things for Lucas to take for lunch during the week. I think I’ll pick up some mason jars this weekend and put a couple of these “emergency salads” in the fridge for nights when there aren’t any leftovers for him to take! Thanks for the inspiration, Min!
Instead of adding the salad dressing on the bottom, before putting on the lid (right on top of the greens), put the salad dressing of choice in a small reusable container…no more soggy salad!
Thanks for your suggestion, Jewel. However, I’ve found that by adding the salad dressing first and separating them from the more delicate veggies, it solves the soggy salad problem. It’s one less container to carry too 😉
Min, you salad artist. Thanks for the tutorial- Cannot wait to impress my friends with it 😉
Thanks for sharing this! I’ve always wanted to try salads in a jar but have been skeptical that everything wouldn’t get all mushy. Maybe I will give it a whirl this week. If you are looking for another use for your mason jars, I use them to make overnight chia seed oatmeal. The jars are great for shaking and mixing.
Thanks for the useful guide! I have sometimes wondered if people just eat their salads from the jars (ignorance showing!) but tipping them out sounds much better 🙂
Love this awesome tutorial, Min! Can’t wait to try this for my lunches!
Thanks Trisha! Let me know how it turns out! I think you’re going to love it
Awesome! Thank you so much for this! I’m always trying to find ways to eat healthier, and the easier things are the better!
You’re welcome, Cristina. I’m definitely on the same boat as you 😉
I LOVE EVERYTHING ABOUT THIS!!! And the step-by-step pics are so fun. Pinning & tweeting now. p.s. Pete does most of the laundry AND dishes, so don’t let Hungryman off the hook that easily 😉
Aww thanks, Sonali! He does?!?! I MUST tell Tim haha
love this how-to! I know my readers @ Mom to Mom Nutrition will too! definitely sharing on facebook for them next week!
Thanks, Katie! I sure hope your readers will find this helpful!
Love your tutorial! I never would have put raw zucchini into a salad but it looks delicious bathing in the dressing at the bottom 🙂
Yup I def like to roast or grill my zucchini when adding to salad. However, in this case, they not only keep the rest of the ingredients in the jar from getting soggy, but they also soak up the dressing quite nicely 😉